HEIC to JPG: Convert iPhone Photos Without Losing Quality

Ever taken a stunning photo on your iPhone, sent it to a friend or tried to upload it to a website, only to be met with a frustrating 'file not supported' error? If so, you've encountered the HEIC format. Apple made it the default for a reason, but its lack of universal compatibility can be a real headache.
Don't worry, you don't have to choose between high-quality photos and shareable ones. This comprehensive guide will demystify the HEIC format and walk you through multiple ways to convert your iPhone photos to the universally accepted JPG format—all while preserving the quality you worked so hard to capture.
Understanding the HEIC Format
Before we dive into the conversion methods, it's helpful to understand what HEIC is and why Apple switched to it in 2017 with iOS 11.
What is HEIC?
HEIC stands for High-Efficiency Image Container. It's a modern image format based on the HEVC (High-Efficiency Video Coding) or H.265 video compression standard. Think of it as the next-generation successor to JPG, designed to store high-quality images in much smaller file sizes.
The Advantages of HEIC
Apple's decision to adopt HEIC wasn't arbitrary. The format offers several significant benefits over the older JPG format:
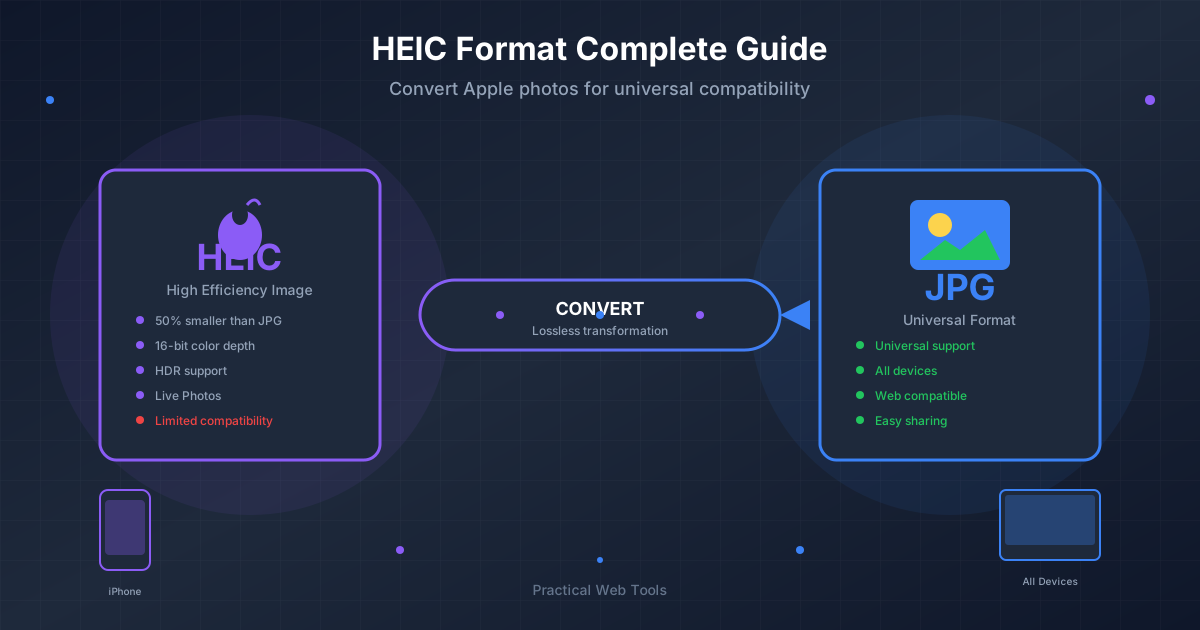
- Superior Compression: This is the headline feature. HEIC files can be up to 50% smaller than JPG files of comparable visual quality. For users with thousands of photos and limited device storage, this is a game-changer.
- Higher Quality: HEIC supports 16-bit deep color, whereas JPG is limited to 8-bit. This means HEIC can capture a much wider range of colors, resulting in smoother gradients and more lifelike images.
- Versatility: HEIC is a 'container' format. This means a single
.heicfile can store more than just one image. It can hold image sequences (like Live Photos or bursts), depth maps (for Portrait Mode effects), alpha channels for transparency, and more.
The Big Disadvantage: Compatibility
For all its technical superiority, HEIC has one major drawback: it's not universally supported. While the entire Apple ecosystem (iPhones, iPads, Macs) handles it flawlessly, many other platforms do not. This includes:
- Older versions of Windows and Android.
- Many web browsers and social media platforms (though this is improving).
- Most digital cameras and photo printing services.
- A wide range of photo editing software.
This compatibility gap is the primary reason you'd need to convert HEIC to JPG.
Does Converting HEIC to JPG Reduce Quality?
This is the most common concern, and it's a valid one. The short answer is: not in any way you'd notice, if done correctly.
Here's the technical breakdown:
Both HEIC and JPG are 'lossy' compression formats. This means they reduce file size by permanently discarding some image data. However, they are designed to discard data that the human eye is least likely to perceive.
When you convert from HEIC to JPG, you are essentially decompressing the HEIC data and then re-compressing it using the JPG algorithm. The key to preserving quality lies in the settings of that re-compression step. A high-quality online converter or a native app with a 'quality' slider set to 90-100% will create a JPG that is visually indistinguishable from the original HEIC file. You get the compatibility of JPG without a perceptible drop in quality.
The goal isn't a technically 'lossless' conversion, but a 'visually lossless' one. For sharing online, printing, or editing, the resulting high-quality JPG will be more than sufficient.
Method 1: The Easiest Way - Use an Online Converter
For speed, convenience, and batch processing, nothing beats a dedicated online tool. You don't need to install software, change system settings, or follow complicated steps. It's the perfect solution for quickly converting one or many photos.
We recommend our own free, privacy-focused tool for the job. The Practical Web Tools HEIC to JPG Converter is designed to be simple and effective, prioritizing quality above all else.
How to Convert HEIC to JPG Online (Step-by-Step)
- Navigate to the Tool: Open your web browser and go to the HEIC to JPG converter.
- Upload Your Files: You can either drag and drop your HEIC files directly onto the page or click the 'Select Files' button to browse your computer or phone.
- Automatic Conversion: The tool automatically begins the conversion process the moment you upload the files. It's optimized to use a high-quality setting to ensure your photos look great.
- Download Your JPGs: Once complete, you can download your new JPG files individually or as a single ZIP archive if you converted multiple images.
Why use this method?
- Fast and Easy: It's the most straightforward method available.
- No Installation: Works in any modern web browser on any device (Windows, Mac, Linux, Android).
- Batch Processing: Easily convert dozens of photos at once.
- Privacy-Focused: Your files are processed securely and are not stored on our servers.
Method 2: Convert Directly on Your iPhone or iPad
Your iOS device has built-in ways to convert HEIC files, although they aren't as direct as a dedicated tool.
Automatic Conversion on Transfer
By default, your iPhone is already set up to solve this problem for you when you transfer photos to a computer.
- Go to Settings > Photos.
- Scroll down to the 'Transfer to Mac or PC' section.
- Ensure 'Automatic' is selected.
With this setting, when you connect your iPhone to a PC or use AirDrop to a non-HEIC-aware Mac, your photos will be automatically converted to JPG during the transfer process.
The Files App Trick
This is a clever workaround to convert photos without needing another device.
- Open the Photos app and select the HEIC images you want to convert.
- Tap the Share icon in the bottom-left corner.
- In the share sheet, tap 'Copy Photos'.
- Now, open the Files app.
- Navigate to any folder (e.g., 'On My iPhone').
- Tap and hold on an empty space and select 'Paste'.
Your photos will be pasted into the folder as JPG files, which you can then share from the Files app.
Method 3: Convert on a Mac Computer
If you've already transferred your HEIC files to a Mac, you have two excellent built-in options.
Using the Preview App
Preview is macOS's surprisingly powerful default image viewer.
- Double-click your HEIC file to open it in Preview.
- From the menu bar at the top of the screen, click File > Export.
- In the export dialog box, click the 'Format' dropdown menu and select JPEG.
- Crucially, use the Quality slider. Drag it towards 'Best' to minimize quality loss.
- Rename the file if you wish and click Save.
Using the Photos App
If your images are already in your Mac's Photos library, this is the most direct method.
- Open the Photos app and select the image(s) you want to convert.
- From the menu bar, click File > Export > Export [X] Photo(s)...
- A new window will appear. Under 'Photo Kind', choose JPEG.
- Select your desired quality from the 'JPEG Quality' dropdown (High or Maximum is recommended).
- Click Export, choose a location, and your JPG files will be saved there.
Method 4: Convert on a Windows PC
Modern versions of Windows (10 and 11) can handle HEIC files, but they often require a small, free extension from Microsoft.
Step 1: Install HEIF Image Extensions
If you try to open a HEIC file and Windows can't read it, it will usually prompt you to download the necessary codec from the Microsoft Store. You'll need two things:
- HEIF Image Extensions (Usually free)
- HEVC Video Extensions (This may cost $0.99, but often the free HEIF extension is sufficient for photos)
Once installed, you'll be able to view HEIC thumbnails in File Explorer and open the images in the Windows Photos app, just like a JPG.
Step 2: Convert Using the Photos App
After installing the extensions, conversion is simple:
- Double-click the HEIC file to open it in the Windows Photos app.
- Click the '...' icon in the top menu bar and select 'Save as'.
- In the 'Save as type' dropdown, choose .jpg.
- Click Save.
Optimizing Your Photo Workflow
Instead of constantly converting, you might consider adjusting your workflow.
Making JPG Your iPhone's Default
If you consistently run into compatibility issues and don't mind larger file sizes, you can tell your iPhone to shoot in JPG by default.
- Go to Settings > Camera > Formats.
- Select 'Most Compatible'.
Your iPhone will now save all new photos as JPGs and videos as H.264 MOV files. Note that this will disable certain video modes like 4K at 60fps and 1080p at 240fps.
Thinking in Reverse: JPG to HEIC
Sometimes, you might want to go the other way. If you have a large archive of JPGs and want to save significant storage space, converting them to HEIC can be a smart move. You can use an online tool like our JPG to HEIC converter to shrink your photo library for archival purposes.
Image conversion is a common task for any digital creative or social media user. After converting your image, you might need to prepare it for a profile picture or a product listing by getting rid of the background. A tool like a Background Remover can be the perfect next step in your editing process.
Your Photos, Your Format: The Final Word
HEIC is a technologically superior format that saves precious space on your devices. However, JPG remains the undisputed king of compatibility. Understanding the strengths and weaknesses of each allows you to make the best choice for your needs.
Converting from HEIC to JPG without a noticeable loss in quality is not only possible—it's easy. Whether you use a quick online tool, a built-in function on your iPhone, or a native desktop app, you have plenty of options to ensure your photos can be viewed, shared, and enjoyed by everyone, on any device.
Ready to make your iPhone photos universally compatible in seconds? Give our free and secure HEIC to JPG converter a try and share your memories without a second thought!